Saturday, April 30, 2011

Dad Cards & A Free Digi

I started to create cards to fill my next box today and while it will include a variety of general themes, where guy cards are concerned I decided that I'd switch to using 'Dad' sentiments, even though I expect to ship my next box before the Father's Day deadline, so that they'll be flexible. I created this digi with Father's Day in mind but it could definitely make a great birthday card for Dad too.


Here is the digi for you. As always feel free to use this image in any of your crafting projects. Post a link back here if you'd like to share it but please do not sell it, repost it or claim it as your own. Just click on it and then use the 'save as' command to save it to you computer.

Happy Crafting Everyone!
signature

Thursday, April 28, 2011

Any Hero Cards

I try to write a few 'Any Hero' notes to include in every box of cards I ship to OWH. I admit that writing a note to someone I don't know and have never met isn't always the easiest thing for me to do but after I have, I am always glad I did and it helps to crystalize for me just how much these heroes sacrifice for all of us. 


 A few times a year I dedicate a crafting session or two to making Any Hero cards so that I always have some ready to go when I need them. I got both of these digis free and pre-colored from the very talented and generous Nikki at Melonheadz Illustrating. If you haven't yet discovered her blog I promise that you're in for a treat.


Keep in mind that unlike the cards we send to heroes for them to write home on, Any Hero cards do not have to be hand-crafted. If you'd like ot write some cards but don't know where to start you can visit the OWH site for help, guidelines and even free coloring pages for the kids!

Happy Crafting Everyone!
signature

Tuesday, April 26, 2011

A Cram Course in A Few Blogger Basics

OWH sponsors "Blog Hops" on a regular basis and I know I was confused and intimidated when I made my first attempt to join in the fun so I've decided I'd write up a post that might help some of you who might want to participate but feel you're not tech savvy and not sure you can do it. I am far from being a "professional" in the realm of blogging but hope that I can help ease your way with these few simple lessons.

Note: You should be able to click on these images to make them larger and easier to read.

Checking Your Time Zone
1) Go to "Settings".
2) Choose the "Language & Formatting".
3) Check your time zone. As you can see here I'm on the East Coast. Most of the OWH hops/events are scheduled on EST Time so you may find it easiest to use this setting if you mostly blog to participate in OWH events. If you decide to use your own time zone just be sure you do the math and are careful when you schedule posts. (More on that later in these lessons).


Scheduling Posts to Be Published (Go Live) at a Specific Date and Time
Scheduling your post to appear at a specific time is a great thing to know how to do and it's quite simple. Knowing this little trick means your post can appear to have just been "posted" while in fact you set it up weeks ago and you're actually lounging on a beach in the Bahamas! (Margarita anyone?)

1) Create your post as your normally would.
2) Under "Post Settings" on the right of your screen is the "Set Date and Time" option.


3) Click the "Set Time and Date" (choosing automatic posts the entry immediately). Click on the calendar to choose the DATE and then type in the TIME you want your post to "go live". It's important that you know WHAT TIME ZONE setting you are using,  (there is a reminder noted just below the calendar) to be sure your post will "go live" when you expect it to.  Remember back in the beginning of this cram course I set my time zone at EST, so the post example you see here would go live at 9:42 PM on the East Coast but my friends in San Diego would see this post at 6:42 PM because of the time difference.


4) After you've input your date and time settings click on PUBLISH POST. While this may not "seem" right, it is. Once you do this you will then be able to see exactly what you have set up when you click on "POSTS" in the left column you can see a list and the status of all your posts. You can still go back and edit, delete or even change the scheduled date and time if I want or need to.


Turning Off Word Verification
Turning off word verification means someone visiting your blog can leave a comment without the extra step of 'word verification'. It makes leaving a comment especially easy when you are taking part in a blog hop or online event. You can turn it on and off easily so it makes sense to turn it off at least temporarily if you are taking part in an event to make commenting fast and easy for your visitors. I should mention that turning verification off can also open you up to receiving 'spam comments' but blogger does have some built in filters to keep most spam from being published and you can also choose to review comments before they are published under the "COMMENT MODERATION" option on this same screen.

1) Go to "Settings".
2) Choose "Posts & Comments".
3) Next to word verification click on "No".
5) In the upper right, click the "Save Settings" button to retain the change.

You can go back at anytime, the same way, click YES and SAVE SETTINGS and word verification will once again be required of anyone trying to leave you a comment.


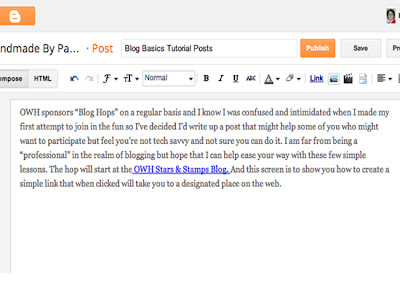
Creating a Simple Link in Your Post
1) In your post highlight the text you wish to turn into a link.
2) Click the LINK tool on the tool bar.


3)  A new window (below) will open in front of your post window. Notice the TEXT TO DISPLAY box is automatically filled with the words you highlighted. Fill in the box that is asking for the URL (which stands for Uniform Resource Locator, in case you enjoy trivia) which is the web page (or blog etc.) address you want that link to take your reader to.


4) In my example here  I am creating a link to the OWH Stars & Stamps Blog. I cut and pasted the address into my box to make it easier and avoid any typos but you can type it too. Just be sure you remember to use the 'test this link' option you see in blue right below where you've entered the URL so you are certain the link goes where you expect it to. Clicking the 'test this link' option should open up the 'destination' page in a new browser window.

5) Make sure you click the OK button in the lower left corner of the 'Edit Link' window to save your entries/edits. Here below you can now see what the link looks like in my blog post. Though it appears in blue and underlined in my sample you can use the toolbar to edit color, font etc. Just be sure if you do make edits that you recheck your link. I typically make 'checking my links' one of the last things I do before I publish (or schedule) my blog post.


Add a Supplied Badge to Your Blog Post
1) Create your post as usual. Notice that the COMPOSE tab is shaded a darker grey when chosen. Typically you will work in COMPOSE mode when you type your text and add your images.

2) When you are ready to add your badge (or any pre-coded link) switch to HTML mode. Notice how now the HTML tab is shaded darker grey and you see HTML 'coding' that represents setting for fonts, sizes, colors etc.


3) Next cut and paste the provided text (top image) into the post while in HTML mode (bottom image). You can see that the text I cut from the supplied badge link/artwork now appears at the very top of my post in HTML mode.


4) When you click the tab to return to 'Compose' mode you will now see that the badge artwork appears. Clicking on this encoded badge art will now cause the viewer to be directed to the designated page (the top of the OWH Blog Hop in this example).


Whether you are new to blogging or just want to learn a little something you didn't know I hope you found these short lessons a helpful guide and that you'll be encouraged to join in some of the fun online events hosted by Operation Write Home. 

Happy Crafting and Blogging Everyone!

signature


P.S. — If you'd like to start a blog and need some basic guidance I'd suggest you visit this page at Dummies.com which has six fairly simple lessons on the essentials of getting started with blogger.

Wednesday, April 20, 2011

Monochromatic Designs

While most people can name their favorite color(s) without giving it more than a few seconds thought, for me that can be a hard question to answer. I love color. All of it.

I spent some time this weekend creating cards with a Monochromatic color scheme. The dictionary definition of Monchromatic is: containing or using only one color. A more in depth study of color would reveal that it would include all tints (created by adding white), shades (created by adding black) and tones (created by adding grey) of the pure hue. A great basic lesson in color can be found at Tiger Color. 
 
Here are the cards I created:

Papers: Recollections, Michael's Crafts 
Sentiment: StampinUp – Image: My clip art collection. 


 Papers: Recollections, Michael's Crafts - Sentiment/Image: StampinUp
 Edge Punch: EK Success


Papers: Recollections, Michael's Crafts & DCWV 
Image/Punch: StampinUp

 Papers: Recollections, Michael's Crafts - Sentiment: Hero Arts
Image: My Clip Art Collection

Papers: Recollections, Michael's Crafts & DCVW -
Image: Dover Publications Clip Art


If you find creating a Monochromatic design an intimidating or confusing challenge here is my suggestion: Choose your main color first (you'll most likely base your color choice on your image if you're using one on your card), then go through your supplies and gather as much as possible in your selected color. Papers, Ink, Ribbon, Embellishments. Remember that you'll want elements in a full range of tints, shades and tones of your chosen color. You may also wish to include one neutral color like ivory, tan or white to help you create some nice contrast and draw attention to your focal point. Now you can pretty much choose from everything in front of you with ease and the result will be a beautiful, monochromatic design.

Happy Crafting Everyone!
signature

Saturday, April 16, 2011

OWH Sticker Skip


I don't often use stickers in my card making as I often find myself struggling. When I do I follow a these basic guidelines that I find helpful.

• Large stickers can often be used alone
• Grouped small stickers to create one focal point
• Teeny tiny stickers are often best left for the kids :)
• Buy coordinated papers & stickers

• Layers help to add dimension & detail

I bought my stickers and papers at Michael's at the same time so that I wouldn't struggle to find coordinates in my stash.

  
These cake stickers are puffy and shiny which I thought made them kind of fun and an easy way to add some dimension to the cards.


These flower stickers are also textured and raised. In the Thinking of You card  I popped the large red flower and the sentiment so that the card would have an even thickness (which is important if you want your cards to make it through the postal system in one piece) using the thinner foam tape by 3M, which I have always preferred because it allows me to cut pieces in whatever size I need. 


Thanks for skipping by today! If you didn't start at the beginning you'll want to go back to the OWH Stars & Stamps blog. Otherwise, your next (and last) stop on today's skip is #10 Samantha at Expressions of a Craftaholic.  Samantha is a Stampin Up demo and wife to one of our very own heroes. She has lots of wonderful stuff to see on her blog.


Today's Skip Stops:
 
1) OWH Stars and Stamps
2) Barb at Paper Therapy Ponderings
3) Erica at Creative But Messy
4) Jan at Jan's Gone Stamping
5) Sherry at Bits of Cheer
6) Julie at Handmade by Julie
7) Velda at OldStamper Musings
8) John at John VM's Cards
9) Steph and Robin at SR Cards
10) Paula at Handmade by Paula

11) Samantha at Expressions of a Craftaholic

    Happy Crafting Everyone!
    signature

    Monday, April 11, 2011

    Demand Chocolate Digi & Sketch #64

    When I asked for 'favorite short quotes' a couple posts back I got a few and this one came from Christy. A fun twist on the old "lemons...lemonade" version for sure. I thought it would make nice focal point for this week's Sketch Challenge.


    Here are the digis for you. As always feel free to use this image in any of your crafting projects. Post a link back here if you'd like to share it but please do not sell it, repost it or claim it as your own. Just click on it and then use the 'save as' command to save it to you computer.
    And one in color in case you'd rather just print it and go right to creating your piece.
    Happy Crafting Everyone!

    Saturday, April 9, 2011

    A Free Digi and More Dad Cards

    I've always enjoyed doing cards that have a 'travel' theme and thought a compass would be good for masculine cards, whether for Father's Day or general cards. Here is one of the digis I've been working turned into 'Dad' cards.

      
    I had fun coloring these and couldn't decide on any one color combination so of the six I colored no two are alike. I've done a few of these cards with 'Miss You' sentiments too. The background paper is one I have had for a few years now but I am quite certain you can find something similar at JoAnn's or Michael's in the travel themed scrapbook supplies .

    Here are the digis for you. As always feel free to use this image in any of your crafting projects. Post a link back here if you'd like to share it but please do not sell it, repost it or claim it as your own. Just click on it and then use the 'save as' command to save it to you computer.
    And one variation in color in case you'd rather just print it and go right to creating your piece.


     Happy Crafting Everyone!


    Wednesday, April 6, 2011

    Father's Day Challenge

    These are a couple of the Father's Day cards I have in my current OWH box. Most of the cards I'll make will have a simple 'DAD' sentiment so they could be used for a birthday or even just to send dad a hello. I always try to make cards that cover a lot of bases so they are sure to be useful .

     Papers: DCWV ~ Sentiment: Stampin Up

     Papers & Die Cut Sentiment: DCWV

    I'm finding myself unmotivated by most of the masculine images I have so I'm working on a few digis that I will post within the next few days. If you're working on a Father's Day card for your dad or some for OWH (the OWH deadline of May 21st will be here before you know it!) and could use something new to spark your creativity come on back in a few days.

    Happy Crafting Everyone!

    Sunday, April 3, 2011

    Sunday Sketch & A Quote Digi

    As a graphic designer I've always loved typography and I've always liked quotes. Recently, after seeing a bunch of very nice cards made with quotes I started playing around with quotes & fonts that I could use on some cards. I was happy to find that one I had just completed worked perfectly with this week's OWH sketch.


    Here is the digi for you. As always feel free to use this image in any of your crafting projects. Post a link back here if you'd like to share it but please do not sell it, repost it or claim it as your own. Just click on it and then use the 'save as' command to save it to you computer. 


    If you are going to use it at a small size I'd suggest using the colored version because I found it hard to color neatly.


    Do you have a favorite short quote that would make a great digi? Let me know and I may just surprise you with it here on a future post.

    Happy Crafting Everyone!


    Friday, April 1, 2011

    Spring Flowers

    If it just happens to be cold and maybe even snowy where you are today, I have some Spring flowers to remind you that yes it is indeed Springtime!


    Paper: DCWV Stacks ~ Tag: K & Company ~ Sentiment: Papertrey Ink 
    Colored with Prismacolor Design Studio Markers

    Here is the digi for you. As always feel free to use this image in any of your crafting projects. Post a link back here if you'd like to share it but please do not sell it, repost it or claim it as your own. Just click on it and then use the 'save as' command to save it to you computer. 
    I know that many folks do not like to color (sometimes that includes me :) so today I'm also offering a colorized version of this digi as well.
    Happy Crafting Everyone!
    signature
    Related Posts Plugin for WordPress, Blogger...